
How to Make Worthless Wood-Style Hybrid Pen Blanks (Burl and Alumilite)

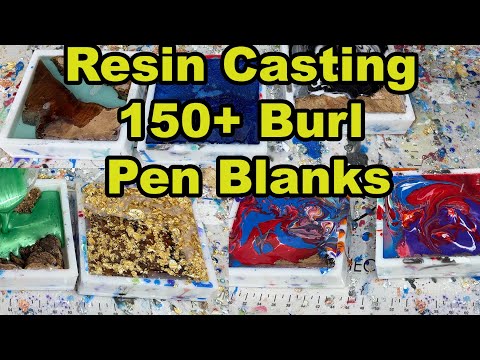
A hybrid pen blank is a piece of wood, usually burl, cast in resin so you get wood and color in the same blank. You'll also hear them called "worthless wood" or "stabwood" blanks. I've made a lot of these resin and burl hybrid blocks over the years. In this guide I'll walk you through how I do it: getting the wood into the mold, mixing and coloring Alumilite, pouring, pressure casting, and cutting the block into pen blanks.
What is a worthless wood blank?
It's a block of wood, usually burl, and resin cast together. The most common uses are pen blanks, bottle stoppers and knife scales, but I've seen these blocks used for bull whips, pool cues and plenty of other things. "Worthless Wood" is also another seller's brand name, so I just call mine hybrid blanks.
What you need
- Stabilized wood. I've used oak burl, spalted oak burl, olive root burl, buckeye burl, red mallee burl, box elder burl, dyed black ash burl, maple burl, dyed maple burl and grapevine. All my grapevine is stabilized with Cactus Juice before it's cast.
- Alumilite Clear resin (a polyurethane resin, Part A and Part B).
- A scale, because Alumilite is mixed by weight.
- Clear mixing cups and popsicle sticks. Clear cups let you see unmixed lines.
- Colorants: mica powders (interference, color shift, holographic), Alumilite dyes, and Alumilite white dye for opaque colors and wave effects. Gold and silver leaf are also an option.
- A pen blank mold (I also use bigger block and bottle stopper molds for larger pieces).
- A hot glue gun to hold the wood down.
- A pressure pot. Pressure is almost a necessity with Alumilite.
- A table saw (and a bandsaw if you want to trim off extra burl).
- Finish for showing the blanks: denatured alcohol for a quick wipe, spray lacquer, or sandpaper and wax.
- A silicone project mat for the casting table, if you have one.
How to make hybrid pen blanks, step by step
1. Prepare the wood and the mold
- Cut the wood to fit the mold. If a piece doesn't fit, I cut it into pieces. A small piece cut close to the mold size can friction-fit snugly enough that it won't move.
- Think about the layout. You can lay the wood flat, stand it up, or place pieces on the left and right with a "river" of resin down the middle. Whatever layout you use, the block will get cut into blanks later, so think about where the wood will end up in each one.
- Hot glue the wood down. I put a little hot glue under each piece so it doesn't float when the resin goes in. Properly stabilized burl really shouldn't float much anyway, but I don't take chances.
2. Mix the Alumilite
- Weigh Part A and Part B. Alumilite is mixed equal parts A and B by weight, so weigh both to the same exact weight.
- Mix until it's completely clear. This is the biggest tip I have. Mix until there are no striations, meaning little lines of unmixed resin following your stick when you drag it across the cup. If you see lines, keep going. If you've seen it, you'll know what I mean.
- Scrape the sides. Unmixed resin can hide on the side of the cup. Scrape the edges and mix it back in.
- Don't worry about bubbles while you mix. The pressure pot takes care of those.
- For two colors from one batch, I mix the whole batch in one cup, then get down level with the table and split it into two cups by eye. It doesn't need to be weighed, since it's only being divided for color.
Weigh enough resin for the mold, but not so much that you waste a lot. On one block I used about 400 grams and it was a little too much, so I poured the extra into a pen blank mold.
3. Add color
- Transparent look: use just a little mica powder and no dye. The resin stays mostly transparent with a pearlescent shimmer, and you can see the wood through it. Interference violet and blue together shift between the two colors in light.
- Slight tint: a very small amount of mica powder gives a light tint. Small amounts clump easily, so push any clumps against the side of the cup to break them up before you keep mixing.
- Solid, deep colors: combine mica powder with Alumilite dye. For example, I've paired blue russet Pearl Ex with red dye, and green apple Pearl Ex with green dye.
- Opaque colors: start with an opaque white base (Alumilite white dye), then add transparent dye for color. The white base is what makes it opaque.
- Mix the powder all the way in. Spend a little extra time here so there are no clumps. When you use a lot of powder, some will stick to the side of the cup. Scrape off as much as you can.
What changed: in my 2017 and 2018 videos I used Alumilite dyes and Pearl Ex powders. Since then I've used my own Wine Country Mica powders. As of my 2025 video they're on TurnTex, so you can order them along with your Cactus Juice or Alumilite.
4. Pour
- Solid colors: pretty much just pour it all in.
- Two transparent colors: pour them in and let them meet on their own. Don't swirl them with a stick. Swirling transparent colors makes them bleed into each other and creates a new color, and it won't look as good unless that's the look you want.
- Slow the pour down when you want colors to stay separate. I pour onto the side of the burl, or move the cup back and forth so the resin lands lightly on top instead of rushing together.
- Waves: pour your base color, then put a little opaque white resin on top and leave it alone. The heavier white sinks on its own and gets pulled around as the resin cures. It took me a long time to learn this, mainly because I kept trying to make the waves with a popsicle stick.
- Multicolor opaque swirls (newest method, 2025): go slow and add a bit of each color at an even pace, going back and forth between them. That gives the most even mix and helps keep colors from bleeding into brown. Early on, let the colors dive through. Toward the end, lay them lightly on top. Then swirl with a popsicle stick or a barbecue skewer. There's no right way to swirl; it comes out about the same however you do it.

5. Pressure cast
- Put the mold on a level rack in the pressure pot. Make sure it's level. On one batch the mold was slightly off level and I didn't use enough resin, and a few blanks came out under 3/4 inch.
- Pressurize. I bring my blue pressure pot up to 80 psi. My two Harbor Freight pots I take up to 50 psi. I don't know the technical difference between 50 and 80 psi for this. Some people say higher is better, some say it doesn't matter. I use 80 because that pot can do it.
- Leave it under pressure. In one video I left the molds in the pressure pot for four hours, and in another for about four or five hours.

6. Demold, cut and check the blanks
- Demold the block. At this point it's usable if it's for you.
- Trim the extra burl on the bandsaw if you want to save it for another casting.
- Cut the blanks on the table saw. I clean the blocks up because I sell them, but even for my own pens I want to see exactly where the wood is and how deep it goes, so I can choose which part to use. My green apple grapevine and Alumilite hybrid pen blanks are 5.5 by 0.75 by 0.75 inches.
- Show off the finish. A wipe with denatured alcohol shows you what the blank will look like when it shines. For photos I spray the blanks with spray lacquer. I've used Deft in the past. On a block, sanding and then wax also works.
Common problems and fixes
Wood floating up
Hot glue the wood to the bottom of the mold, or cut it to friction-fit. Well-stabilized burl shouldn't float much, but glue it anyway.
Lines of unmixed resin
Mix until there are no striations behind your stick, and scrape the sides of the cup. Clear cups make this easier to see.
Colors bled into a muddy mess
With transparent colors, don't stir them together after pouring. With multicolor swirls, add color slowly and evenly instead of all at once, and lay later colors lightly on top.
Clumps of mica powder
Push clumps against the side of the cup and keep mixing. If a small clump ends up in the blank, it's sealed in resin. I've turned pens with clumps in them and they didn't cause a problem.
Blanks too thin
I had a batch where some blanks came out under 3/4 inch because I didn't use enough resin and the mold wasn't quite level in the pressure pot. Pour enough resin and level the mold. I planned to still sell the thin ones for slimline pens, for less, and make that clear.
Dyed wood isn't as bright as you expected
I once dyed a piece of maple burl that had already been stabilized, and it barely took the blue, because the stabilizing was already in the wood.
Seeing the brass tube through a transparent blank
A transparent blank looks great on knife scales and bottle stoppers. For a pen, the brass tube shows through unless you paint the tube.
FAQ
What is a worthless wood blank?
It's a hybrid blank: wood, usually burl, cast together with resin. You'll also see them called stabwood. "Worthless Wood" is another maker's brand name, so I call mine hybrid blanks.
What resin do you use for hybrid pen blanks?
Alumilite Clear, a polyurethane resin mixed equal parts A and B by weight. It's known in the turning community as one of the best resins, especially under pressure.
Do I need a pressure pot?
With Alumilite it's almost a necessity. Pressure is how I deal with bubbles. I don't try to avoid them while mixing.
What psi should I use?
I use 80 psi in one pot and 50 psi in my Harbor Freight pots. Honestly, I don't know whether 80 is better than 50. I use 80 because I can.
Does the wood need to be stabilized?
The burl I cast in these videos was stabilized, and all my grapevine is stabilized with Cactus Juice first. See my stabilizing guide for that part.
Can I swirl colors with a stick?
With opaque colors, yes. That's how I swirl my multicolor blanks. With two transparent colors, don't. It makes them bleed together.
When your blanks are cut, here's how I turn a hybrid pen blank. If you'd rather skip the casting, my grapevine and Alumilite hybrid pen blanks and grapevine swirl pen blanks are grapevine stabilized with Cactus Juice and cast in Alumilite.

