
Alumilite Resin Casting for Beginners: Tools, Tips and Mistakes to Avoid

Alumilite Clear is the resin I use for almost all of my pen blanks. It's a polyurethane resin, it's mixed by weight, and when it cures under pressure it comes out crystal clear. This guide is everything I'd tell someone starting out: the tools you actually need, how I cast pen blanks with Alumilite from start to finish, and the mistakes I made early on so you can skip them.
By the end you'll be able to mix, color, pour and pressure-cast your own blanks, and you'll know why things like foamy resin, bleeding color swirls or see-through pens happen.
What you need
- Alumilite Clear (or Clear Slow). Alumilite is the company; they make a lot of resins. Clear is the one I use. It's a 1 to 1 ratio of part A and part B, by weight.
- A pressure pot. Not optional with Alumilite Clear. It cures in a matter of hours (an hour or two, a little longer for the slow version), so bubbles don't have time to rise and pop on their own like they do with slow-curing epoxies. Pressure shrinks them so the cast cures clear. If you're on a budget, a Harbor Freight pressure pot works; I've had two of them for years and still use them for pen blanks. A pot designed for resin casting (TCP Global, California Air Tools) is the other route. More in my pressure pot guide.
- A scale. Alumilite is mixed by weight, not volume. A 200 gram pour is 100 grams of A and 100 grams of B. Anything that reads to a gram works, but for small pours I really recommend one that reads to a tenth of a gram.
- Clear mixing cups. I use 16 ounce clear cups for about 90% of my casting. Clear matters because you have to see whether A and B are fully mixed.
- Mixing sticks. Jumbo popsicle sticks for the 16 ounce cups, paint sticks for bigger cups. Silicone spatulas work too, but I do five to ten pours in a session and can't wait for them to cure and peel.
- Gloves. I use thin disposable ones because they get covered in colored resin and dye, and I swap them before a clear pour.
- Molds and mold release. HDPE (the white plastic molds you see in my videos) or silicone. More on that below and in my resin casting molds guide.
- Color: Alumilite dyes, mica powders, glitter, or a mix.
- A hot glue gun if you're embedding wood or anything else that wants to float.
Wondering whether you should use epoxy instead? I cover that in Alumilite vs. epoxy for pen blanks.
How to cast pen blanks with Alumilite, step by step
- Make sure anything you embed is 100% dry.
- Any moisture in wood or other material turns Alumilite foamy and bubbly. If your cast comes out like that and you embedded something, that's the problem.
- The best fix is stabilizing, because that process pulls all the moisture out.
- If you don't stabilize, put the material in an oven or toaster oven at about 220°F for 24 hours minimum. Then put it straight into an airtight container while it cools so it doesn't pull moisture back out of the air.
- Porous wood like some burls and buckeye burl will soak up resin. With dark dyed resin every little pore shows up as a colored speck. Stabilize it first, or use clear or a more transparent color.
- Set up your mold.
- For a beginner I actually recommend silicone molds first: demolding Alumilite from silicone is super easy, and you can find almost any shape online.
- For rigid, reusable pen blank molds, use HDPE. Cured Alumilite clings to it but pops right off with a little force. Melamine is the second-best option, but it has particleboard inside and resin seeps into the cracks.
- Use mold release. With HDPE you'll probably want it. With silicone it isn't absolutely necessary, but it only helps.
- If you're doing color swirls, use a wider mold. Single-blank molds work fine, but it's much harder to get a skewer or popsicle stick in there to swirl, or to work around embedded material.
- Glue down anything that wants to float. I started with CA glue, but it sticks to HDPE and left my molds lumpy. Hot glue is cheaper and mostly stays on the resin when you demold. When it does stick to the mold, one pass with a utility knife takes it off.
- Weigh out part A and part B. Equal weights. On small pours, a few grams off matters more, which is why I like the tenth-of-a-gram scale. On big pours you can get away with being a couple grams off.
- Mix fast and mix completely.
- Alumilite (and most polyurethanes) needs to be mixed really quickly. Regular Alumilite Clear has about a seven minute open time.
- Keep mixing until there are no striations and no cloudiness left. That's what the clear cup is for.
- Add color.
- I use Alumilite dyes. Blue, purple and green get pretty much opaque.
- Never use water-based dye. Polyurethanes hate moisture; it may get tacky but it won't cure.
- Alcohol dyes work, but in my experience it's really hard to get an opaque color with them.
- Mica powder on its own is pretty translucent. Either add a lot of it or, what I usually do, add a matching dye too (blue dye plus a blue mica, for example).
- Glitter works, but you need a lot of it; a sprinkle mostly looks like clear resin with sparkles.
- Start light. You can always add more color, but you can't take it out.
- Check opacity before you pour. Resin that looks solid in the cup can be see-through once it's turned down to a thin pen. Pour a little into an empty cup at the thickness you'll end up with and hold it up to the light. Too translucent? Add more dye or powder. Take notes if you're trying to match colors.
- Pour, and time your swirls.
- Color swirls bleed less the closer the resin is to curing. With a seven minute open time, I pour swirls at around six minutes, six and a half if I can push it.
- Pour a red and a blue right after mixing and you're likely to get purple where they meet.
- Opaque colors work best for swirls.
- Into the pressure pot. I leave my casts in the pressure pot overnight.
- Demold, then wait before cutting or turning. Four hours is the minimum I'd recommend before cutting or turning any Alumilite.
- Fix an undersized blank by pouring on top. You can cast Alumilite onto cured Alumilite. If a grapevine blank comes out under 3/4" thick, I pour more on top. But scuff the cured resin with sandpaper first. The first time I skipped that, the new layer peeled on the lathe. Since I started sanding first (a trick from Zac Higgins), I haven't had that issue. I only do this with solid colors.

Embedding gold leaf
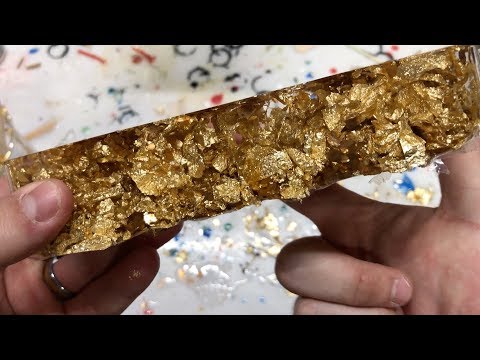
Gold leaf is finicky. When I made a gold leaf and clear Alumilite block, I started stirring the leaf into the cup and could see right away that wasn't the way to do it. So I poured the resin into the mold and added the leaf there instead: a pinch at a time, pressed down with a popsicle stick. Gold leaf is about the same density as Alumilite, so it won't sink or float on its own. You have to push it where you want it. Mica flakes are the opposite: the ones I used are denser and sink to the bottom.
Common problems and fixes
Foamy or bubbly resin around embedded wood
Moisture. Stabilize the wood, or dry it at about 220°F for 24 hours minimum and cool it in an airtight container.
Bubbles in a clear cast
Alumilite cures too fast for bubbles to escape on their own. It has to go in a pressure pot.
Swirls bled together into a muddy color
You poured too early. Wait until near the end of the open time (around six minutes for regular Clear) and use opaque colors.
Colored specks all through a burl
The wood was porous and soaked up dyed resin. Stabilize it first, or use clear or a lighter, more transparent color.
The pen came out see-through
The color wasn't as opaque as it looked in the cup, which is common with mica powder and no dye. Test at the final thickness, and add dye if you don't want the transparent look. (Sometimes I do want it; just plan for it.)
Resin won't cure, or stays tacky
Check for water-based dye or moisture. A truly absurd amount of dye in a small amount of resin can also stop a proper cure, but you'd have to try pretty hard.
A top-up layer peeled off on the lathe
The cured surface wasn't scuffed. Sand it before pouring the new layer.
Embeds floating up
Hot glue them to the mold before you pour.

FAQ
Do I need a pressure pot for Alumilite?
Yes, for Alumilite Clear and Clear Slow. It cures in hours, so you need pressure to shrink the bubbles and get a clear cast. Slow-curing epoxies can skip it because their bubbles have time to rise.
What is the Alumilite mix ratio?
Alumilite Clear is 1 to 1 by weight, part A to part B. Use a scale, not volume lines.
How long before I can turn an Alumilite pen blank?
I leave it in the pressure pot overnight, and four hours is the minimum I'd recommend before cutting or turning.
What dye should I use in Alumilite?
I use Alumilite dyes because they work in everything. Their label suggests about one drop per ounce of resin, but honestly it's up to your eye. Alcohol dyes are fine but hard to make opaque. Never use water-based dye.
Can I pour Alumilite onto already-cured Alumilite?
Yes. Scuff the cured surface with sandpaper first or the new layer won't adhere well.
Will Alumilite come out of clothes?
No. Once it cures on a shirt, it's not coming out. It does wash off your hands and skin.
Want to see the finished result?
If you'd rather start turning than casting, these are the Alumilite blanks I make: my swirled grapevine blanks and the gold leaf or silver leaf Alumilite blanks.

