
How Colored Pencil Pen Blanks Are Made (and Turned)

Colored pencil pen blanks are real colored pencils packed tight in a mold and cast in crystal clear Alumilite. This guide walks through how I make them and how I turn one into a pen, including the problems I ran into so you can avoid them.
By the end you'll know how to cut and arrange the pencils, cast them in Alumilite under pressure, cut the block into blanks, and drill, turn and finish a pencil pen blank without it coming apart on you.
I first made these for a customer who wanted a custom batch. He was turning pens from them for the Make-A-Wish Foundation, for kids in need. I made 10 for him and kept 5 for myself, and that first batch is how I learned to make them consistently enough to sell.
What you need
For casting the blanks
- Colored pencils, still in their packs. For my mold it took about three packs across, and three more packs for the top layer.
- A pen blank mold. Mine screws together, which matters later when you demold.
- Alumilite clear resin (Part A and Part B) and a scale, because it's mixed by weight.
- A cup and something to stir with, plus popsicle sticks to work the resin down between the pencils.
- A few scrap or bad pen blanks and some duct tape to hold the pencils down.
- A pressure pot that will hold 80 psi.
- Mold release (optional; with it you probably won't have to tap the mold to get the block out).
- A table saw to cut the cast block into blanks.
For turning the pen
- A pen kit. I used a rollerball kit, which takes two different drill sizes because the body is thinner than the cap.
- The drill bits your kit calls for.
- Something to color the brass tubes. I used a black Sharpie because I didn't have black paint.
- A barrel trimmer.
- Sharp turning tools.
- Thin CA glue, and plenty of it.
- Denatured alcohol for cleaning before the finish.
- Micro mesh from 600 up to 12,000.
- CA glue for the finish, and HUT Ultra Gloss to polish.
- A pen press or vise for assembly. I use a pen kit assembly vise from Penn State Industries.
Step by step: making colored pencil pen blanks
- Mark the mold length on the pencils.
- Lay the mold next to a pack of pencils and mark the length you need.
- Cut the pencils while they're still in their case. That was by far the best way I found to cut them to length. The pack keeps them together while you cut.
- Arrange the pencils in the mold.
- Put the packs side by side first to see how many you need across. For my mold, about three packs was the width.
- If you want the colors in order, keep them in the same order as the pack. My customer wanted the pack's color order in the blanks, so about 60 to 70 percent of the mold kept that order.
- Two packs won't fit exactly into the top half of the mold, so for the top layer I kept the pencils in order but took out a portion of each pack to make them fit. I needed three packs on top too, without using every pencil from them.
- The pencils end up packed tight, which slows down the pour (see step 4).
- Hold the pencils down.
- I didn't know if the pencils would float, so I laid a couple of scrap pen blanks across the top and duct taped them down.
- As it turned out, they didn't float. I made more of the same blanks for the customer later without taping them and it was fine. I'd still hold them down if you care about the exact orientation of the pencils, because it keeps anything from shifting.
- Mix and pour the Alumilite.
- Alumilite is a Part A and Part B resin mixed exactly 1:1 by weight. Weigh both parts.
- Mix until it's crystal clear and you don't see any more striations or lines. There will be bubbles at this point; the pressure pot takes care of those.
- Pour a little at a time in different spots. Because the pencils are packed so tight, the resin takes a while to seep all the way through, and if you pour too much in one place you'll overflow the mold.
- Use a popsicle stick to help it along. I poke it down between the pencils and move them just a little, not much, only enough to know the resin is getting all the way in. You'll see little bubbles come up the sides as the resin pushes the air out.
- Cure under pressure.
- Put the mold in the pressure pot at 80 psi for at least 4 hours before you cut anything. These sat in there for about six or seven hours.
- Demold.
- Unscrew the mold. I tapped mine on the floor to give it a little give and it popped right out.
- If you use mold release, you probably won't even have to tap it.
- The bottom and sides of the block will show some bubbles where the air came up during the pour. Those are on the surface. Inside the actual blanks there were no bubbles at all.
- Cut the block into blanks.
- I cut them up on the table saw. With three stacks of pencils, each blank ended up with about two full stacks and around 75 percent of the third, and some have almost all three.
- The blanks I sell are 3/4 inch square and 5.25 inches long.
Step by step: turning a pencil pen blank
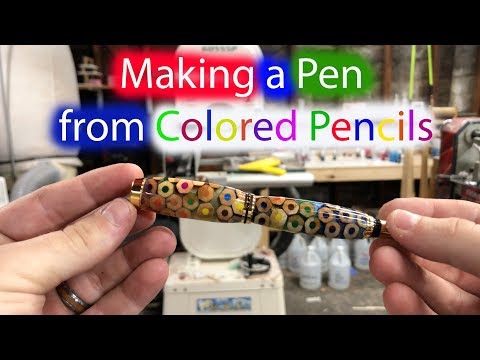
I'll be honest: this was one of the more difficult pens I've made. That's why the blanks are listed for advanced turners only. They're absolutely turnable, but you need thin CA glue on hand for the whole process, sharp tools and light cuts.
- Drill the blank.
- For a rollerball kit, drill the body and the cap separately, since they take two different sizes.
- Color the tubes.
- The resin is clear, so you'll see the brass tube through the pencils. I wanted a darker backdrop to make the colors pop, so I colored the tubes with a black Sharpie.
- The fit was so tight in a couple of spots that putting the tube in rubbed some of the Sharpie off. I think if I'd let it dry another 10 to 15 minutes it might have been fine. It still did the job: the tube came out a grayish color instead of brass, which works better.
- Barrel trim.
- Trim both pieces so the ends are flush with the tubes. You know it's flush when you see a little of the brass tube get shiny.
- Turn with thin CA glue close by.
- The pencil wood isn't bad wood, but it gets stringy. Little pieces flare off as you cut. I stopped a few times and put thin CA glue on to hold it together.
- Where the pencils are cut at an angle instead of straight on, pieces of the colored lead can come out. That only happened a couple of times and was an easy fix with more thin CA.
- Keep your cuts light and your tools sharp.
- Clean it before the finish.
- The pencil wood is porous. On two or three of my pencils, dirt and colored lead from other pencils got sanded into the wood.
- Wipe it down with denatured alcohol before you apply any finish, and scrub the worst spots with it. That helped a lot, and I'd recommend it if you run into the same thing.
- Apply a CA glue finish.
- I used a CA finish on this pen because I think it's by far the best finish here for durability, and it keeps the colors from the lead from bleeding anywhere. It seals everything so it stays intact long term.
- Once it was covered completely in CA, the dirt-in-the-wood problem didn't happen again.
- Sand and polish.
- I go through micro mesh from 600 up to 12,000, then HUT Ultra Gloss after that.
- Assemble.
- Follow the instructions for whatever pen kit you're using, and use some kind of press or vise. I use the pen kit assembly vise from Penn State Industries.
Common problems and fixes
The resin won't soak through the pencils
The pencils are packed tight, so the resin sits on top. Pour a little in several spots instead of all in one place, give it time to seep down, and work it in with a popsicle stick. Don't rush it or you'll overflow the mold.
Bubbles on the outside of the block
Bubbles on the bottom and sides come from the air the resin pushes out as it soaks through. On mine they stayed on the surface, and after at least 4 hours at 80 psi in the pressure pot the blanks themselves had none.
The block is stuck in the mold
Tap the mold on the floor after unscrewing it. Next time, try mold release.
The wood gets stringy and flares off while turning
That's just how the pencil wood cuts. Stop and apply thin CA glue to hold it together, then keep going with light cuts and sharp tools.
Pieces of lead pop out
This happens where a pencil is cut at an angle. Fill and hold it with thin CA glue and keep turning.
Dirt or other colors sanded into the wood
The pencil wood is porous and grabs dust and lead while you sand. Clean and scrub with denatured alcohol before the finish, then seal it completely with CA.
The coloring on the tube rubbed off
If you color the tubes with a marker, let it dry longer before you put the tubes in. In a tight hole the Sharpie rubbed off in a couple of spots on mine.
FAQ
Are colored pencil pen blanks hard to turn?
Yes, harder than most. It was one of the more difficult pens I've made, which is why I list them for advanced turners only. With thin CA glue throughout, sharp tools and light cuts, they're absolutely turnable.
What resin do you cast colored pencils in?
Crystal clear Alumilite. It's a two-part resin mixed 1:1 by weight, and I cure it in a pressure pot at 80 psi for at least 4 hours.
Do colored pencils float in resin?
Mine didn't. I taped scrap blanks over the first batch just in case, then made more without taping and they stayed put. I'd still hold them down if you want the colors to stay in an exact order.
What's the best finish for a pencil pen blank?
I use a CA glue finish. It's durable and it seals the lead so the colors don't bleed. Clean the blank with denatured alcohol first, then sand with micro mesh 600 to 12,000 and polish with HUT Ultra Gloss.
Is a crayon pen blank the same thing?
No. A lot of people search for crayon pen blanks, but what I make and show here are colored pencils, wood casing and all, cast in resin. I haven't covered crayons in these videos.
What size are your colored pencil pen blanks?
3/4 inch square and 5.25 inches long, priced per blank.
If you'd rather skip the casting and go straight to turning, my colored pencil pen blanks are cast the same way in clear Alumilite and ready to drill.
